
Garden Design
The Hexagonal Raised Bed Garden: A Simple Wooden Frame Design Where Everything Is Within Arm’s Reach
A step-by-step plan for building a hexagonal raised bed garden from simple wooden frames — cut angles, soil volumes, honeycomb layouts, and a keyhole variation that keeps every plant reachable.

Most home gardens start the same way: a rectangle. Four boards, four screws in each corner, a pile of soil, and a hope that everything works out. Rectangles are easy to build, and there is nothing wrong with them — but after a season or two, most gardeners notice the same set of small frustrations. The corners get compacted and forgotten. Squash leaves swallow the only two sides you can actually stand on. Long straight paths turn every harvest into a walking tour. And the far side of a wide bed becomes the place where produce quietly goes to seed because leaning across it is a chore.
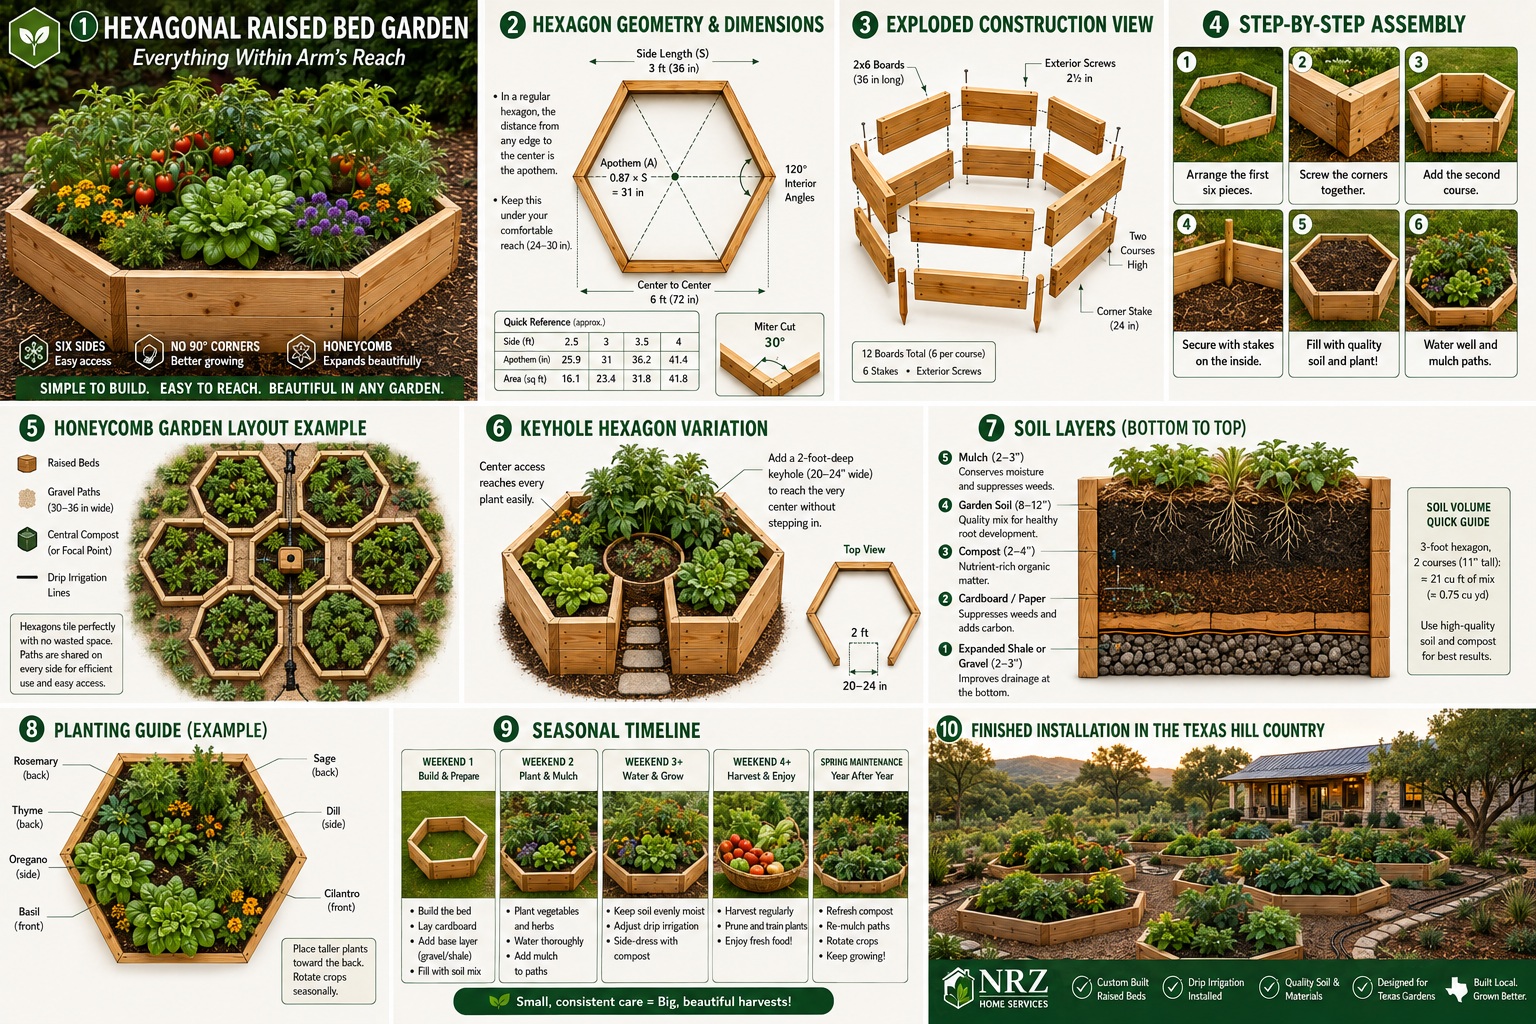
A hexagonal raised bed solves most of that with geometry rather than effort. Six shorter sides means six places to stand instead of two. The 120-degree corners are open enough to plant and harvest without contorting. And when you eventually want a second bed, hexagons tile together into a honeycomb, where paths are shared on every side instead of running in long parallel corridors. Below is a complete design you can build with ordinary lumber and a miter saw, along with the numbers that make it work.
Why the Hexagon Actually Helps
It is worth being honest about what a hexagon does and does not do, because the internet tends to oversell shaped beds. A hexagon is not a magic yield multiplier, and it does not grow more food per square foot than a rectangle. What it changes is how you interact with the bed.
- Six approach angles instead of two. If a tomato cage, a hose reel, a trellis, or a neighboring bed blocks one side, you still have five other ways in. In a 4x8 rectangle, losing one long side means losing half your access.
- No 90-degree corners. Square corners are where soil compacts, where weeds hide, and where you plant something in April and rediscover it in July. A 120-degree corner opens toward you.
- You pivot instead of walk. On a bed with roughly three-foot sides, you can harvest a whole section by turning in place and taking two steps, rather than walking the length of a long rectangle and back.
- Honeycombs share paths. Hexagons tile with no wasted gaps, and paths meet at 120-degree junctions — which is a far easier turn for a wheelbarrow than the 90-degree corner of a grid layout.
- It grows one cell at a time. Add a single hexagon next season and the layout still looks deliberate, which is rarely true when you bolt another rectangle onto a row of rectangles.
The Number That Drives the Whole Design
Every good raised bed design starts with one measurement: how far you can comfortably reach into soil without stepping on it or straining your back. For most adults that is somewhere between 24 and 30 inches. Write your own number down before you cut anything, because it determines how big your hexagon can be.
In a regular hexagon, the deepest point is the exact center, and its distance to the nearest edge is what geometry calls the apothem — about 0.87 times the length of one side. That gives you a simple rule of thumb:
“Side length × 0.87 = the distance from any edge to the center. Keep that under your comfortable reach, and no plant in the bed is ever out of range.”
Run the numbers and the sweet spot appears quickly. A hexagon with 3-foot sides puts the center about 31 inches from the nearest edge — reachable for most people with a slight lean — and gives roughly 23 square feet of growing space. Push the sides to 4 feet and the center jumps to about 41 inches away, which is where the design stops working. That is the practical ceiling for a solid hexagon, and it is also the reason for the keyhole variation further down.
Bed A: The 3-Foot Starter Hexagon
This is the bed to build first. It is small enough to finish in an afternoon, big enough to be genuinely useful, and it teaches you the one cut you need for every hexagon you will ever build.
Materials
- Four 10-foot 2x6 boards in cedar or untreated lumber — each yields three 36-inch pieces, for the 12 pieces you need (six per course, two courses tall).
- Six 24-inch stakes cut from cedar or untreated 2x4 scrap, or six 18-inch lengths of rebar, to pin the corners.
- Two and a half inch exterior-grade deck or structural screws.
- About 21 cubic feet of soil mix — roughly three-quarters of a cubic yard, or about 15 of the standard 1.5-cubic-foot bags.
- Cardboard or unwaxed kraft paper to smother grass under the bed, plus mulch for the paths.
The One Cut You Need
Set your miter saw to 30 degrees. That is it. A regular hexagon has 120-degree interior corners, and two boards each cut at 30 degrees off square meet to form exactly that. Cut all 12 pieces with the miters angled the same direction on both ends — 36 inches measured along the long (outer) edge — and the inner edge will come out around 34 inches, which is correct and expected.
A 2x6 is five and a half inches wide, which most 10-inch miter saws will cut at 30 degrees in a single pass. If your saw cannot manage the full width, cut from both faces or use a circular saw with a speed square clamped as a guide. This is also why the design uses 2x6 rather than 2x10 or 2x12: two stacked courses of 2x6 give you an 11-inch bed depth, which is plenty for everything short of full-size root crops, and the boards stay easy to cut and carry.
Assembly
- Lay the six boards of the first course on flat ground in a ring, miters together, and check the shape before fastening anything. Every side should measure the same and the distances across opposite flats should match.
- Pin each corner from the outside with a stake driven 12 to 18 inches into the ground, then screw the boards to the stake rather than trying to screw board-end into board-end. End-grain screws in a mitered corner will pull loose within a season; a stake behind the joint carries the soil load and keeps the corner tight.
- Stack the second course on top, offsetting each board so its joints land at the midpoint of the course below where possible — the same principle as running bond in brickwork. Screw the upper course down into the lower one and into the same corner stakes.
- Check that the frame is level across at least three opposite pairs of sides. On sloped ground, dig the high side down rather than shimming the low side up.
- Lay cardboard across the entire footprint, overlapping the seams by six inches, and wet it down. You do not need to remove the grass beneath it.
- Fill with soil mix, water it thoroughly, and let it settle for a few days before planting. Expect to top it off — new beds always sink an inch or two.
Bed B: The Keyhole Hexagon for Bigger Spaces
If you want a single substantial bed rather than a cluster of small ones, the hexagon still works — but only if you cut a path into it. Build the frame with 5-foot sides, then notch a two-foot-wide corridor from the midpoint of one side straight to the center. That corridor is where you stand.
The math is satisfying. A solid 5-foot-side hexagon would put its center more than 4 feet from any edge, which is unusable. Add the notch and the farthest point in the bed sits about 26 inches from either the outer frame or the corridor — comfortably within reach. You end up with roughly 56 square feet of growing area, more than double the starter bed, with nothing out of range. Line the corridor with pavers or thick mulch so you are not standing in mud after a rain, and plan on about 80 linear feet of 2x6 for two courses plus the notch walls, and roughly 1.9 cubic yards of soil.
Point the notch toward your water source and your kitchen door. It sounds like a small thing. It is the difference between a garden you visit daily and one you visit on weekends.
The Honeycomb: Planning for Bed Three Before You Build Bed One
The real payoff of hexagons is what happens when you have several. Arrange six 3-foot hexagons around a seventh and you get a honeycomb roughly 19 to 20 feet across, with 24-inch mulched paths between every bed and about 160 square feet of growing space. No bed is more than a step from a path, and no path dead-ends.
Two suggestions if you go this route. First, make the center hexagon do something structural: a compost cage, a rain barrel on a stand, a water spigot, or a tall trellis hub for pole beans and cucumbers. A honeycomb with a purposeful middle reads as a designed garden rather than a collection of boxes. Second, sketch the full honeycomb on paper — or with stakes and string in the yard — before you pour soil into the first bed. Beds are easy to add and miserable to move.
Orientation matters more than most plans admit. In Texas and across the southern half of the country, the afternoon west sun is the limiting factor, not the amount of light. Place taller structures and any shade cloth on the west and southwest edges of the cluster, and reserve the beds that catch late-afternoon shadow for greens and herbs that bolt in heat.
Choosing Lumber: Untreated Wood, With Cedar at the Top
Build these frames from untreated wood, and if the budget allows, build them from cedar. Cedar heartwood carries natural oils that resist rot and insects on their own, it stays dimensionally stable through the wet-dry swings of a Texas year, and it weathers to a pleasant silver-gray if you simply leave it alone. For a frame that will hold damp soil against wood season after season, those qualities are worth the extra cost.
Other untreated species serve well too. Untreated cypress, redwood, and Douglas fir are all solid choices, as is ordinary untreated framing lumber, and each of them keeps the frame chemistry-free where it meets the soil your food grows in. Two habits will get the most years out of whichever you choose: keep mulch and soil from mounding against the outside faces so the boards can dry between rains, and site the bed where water drains away rather than collects. And because every board is fastened to a corner stake rather than to its neighbors, refreshing a single piece years down the road is an afternoon of work rather than a rebuild.
Filling the Beds
Raised beds are especially worth the effort in the Hill Country, where thin topsoil over limestone and caliche makes in-ground gardening a genuine fight. A raised bed lets you skip that fight entirely by building the soil you want from scratch.
A mix that works well here is roughly half screened topsoil or a quality garden soil blend, about 30 percent finished compost, and the remainder a coarse material for drainage — expanded shale is a long-standing recommendation for Texas gardens because it opens up heavy soil and keeps doing it for years. If you choose to fill the lower portion with logs and branches, plan on the bed settling noticeably over the first year or two as that material breaks down, and top it off as it does. Mulch the surface two to three inches deep after planting; in a Texas summer, mulch does more for your water bill than almost anything else you can do.
What to Plant First: Start With Herbs
If you are unsure what belongs in a brand-new bed, herbs are the easiest possible answer. They are forgiving of imperfect soil, most of them prefer the sharp drainage a raised bed naturally provides, they are harvested continuously rather than all at once, and they are the crop most likely to change how you actually cook. A single bed of herbs delivers more usable value per square foot than almost anything else a beginner can plant.
They also suit the hexagon well. Ring the outer edge with the perennials that love heat and lean soil — rosemary, thyme, oregano, sage — and keep the center for the annuals you replant each season. In Zone 8b, basil thrives through the summer heat while cilantro and dill are cool-season crops that do far better sown in fall or late winter than in July. Early August, as it happens, is when the fall planting window opens across much of Texas, which makes it a good moment to have seed on hand.
Seed is the inexpensive part of a garden, and a variety pack is a low-risk way to find out what you will actually use. We keep an organic herb seed assortment in the shed for exactly that reason — sowing a short row of five or six kinds and paying attention to which ones end up in the kitchen beats committing a whole bed to one guess. If you would rather not chase down individual packets:
Opens in a new tab. A multi-packet assortment of culinary herb seeds for indoor or outdoor sowing. Included varieties, pricing, and availability are set by the seller and are subject to change — check the listing and confirm the planting dates on each packet against your own growing zone.
Whatever seed you use, sow a little at a time. A short succession of small sowings every few weeks keeps a herb bed productive far longer than planting everything on the same afternoon.
A Realistic First-Season Timeline
- Weekend one: mark the footprint with stakes and string, live with it for a few days, and confirm the sun and the walking routes before you commit.
- Weekend two: cut and assemble the frames. One 3-foot hexagon is a comfortable afternoon; a full honeycomb is a multi-weekend project.
- Weekend three: cardboard, soil, water, and let it settle. Resist the urge to plant into loose, unsettled soil.
- Weekend four: plant the perennial herbs around the perimeter, sow annuals in the middle, mulch everything, and set up watering.
- Ongoing: top off the soil each spring, refresh mulch twice a year, and add the next hexagon when the first one has proven itself.
One note on watering, since it is where most new raised beds fail. Raised beds drain faster than ground soil by design, which is a benefit for root health and a liability in August. A simple drip line or soaker hose on an inexpensive timer is a worthwhile addition — hand-watering a garden every evening is a commitment that tends to lose out to real life by mid-summer.
If You Would Rather Not Design It Yourself
Layout is the part of a garden that is cheap to change on paper and expensive to change once there are two cubic yards of soil in the wrong place. Sun angles, slope and drainage, the reach of your hose, where the beds sit relative to the kitchen door, and how the whole thing looks from the patio all matter, and they are much easier to sort out before the first cut.
NRZ Home Services offers Garden Design Consulting for homeowners across Lakehills, Bandera, Pipe Creek, San Antonio, and the surrounding Hill Country. We will walk the property with you, read the sun and the drainage, and lay out a bed plan sized to what you actually want to grow and how much time you want to spend on it — whether that is one hexagon by the back door or a full honeycomb. If you would like us to build it as well, our landscaping crew handles the frames, soil, paths, and irrigation. And if you would rather build it yourself, that is a perfectly good outcome too; take the plan and run with it.
Estimates and initial consultations are free. Send us a photo of the space through our contact form and we will tell you honestly what we think will work there.